Announcement

Collapse
No announcement yet.
X
 
  • Filter
  • Time
  • Show
Clear All
new posts

  • "Hack Saw" Build 4x7 tiny off road trailer. Built April-May 2020

    Good day to all of you!

    I wanted to share my build with you all from start to finish. I started my build in April 2020 during the Covid shut downs in my home state of KY. Before the shut downs, I had already hired a friend of mine to build the trailer frame and had ordered some parts. When we were all forced to stay at home to "flatten the curve" I started building my camper. I originally wanted to build something similar to the Oregon Trailer Do Drop Alpha, but decided on a smaller version of a build I saw online called the Saw Tooth.

    The Trailer:

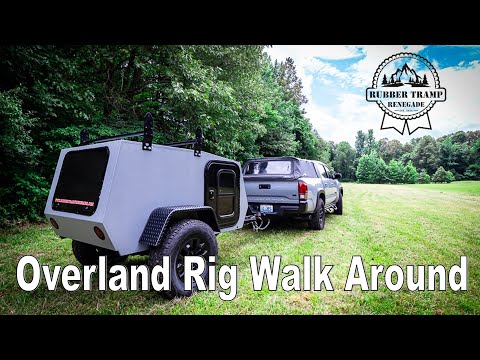
    I started with a home made frame built out of 2x2 square tubing that had 1/8 inch wall thickness. For axles I used the Timbren axle less suspension coupled with idler hubs with the same bolt pattern as my Tacoma pickup truck. I used a 2 inch female receiver hitch for the tongue for using a lock n roll style hitch. I added scissor type leveling jacks on the rear of the trailer and a swiveling tongue jack with a dual wheel at the front of the trailer. I used the same wheels as my truck with the same size tire. I bought a complete set of wheels and tires used from a friend. While the tire tread is different than what is on my truck, the tire size is the same so I only have to have one spare between the truck and trailer.


  • #2
    The Body:

    While the frame was being built, I started on the body. I sketched out a design that I wanted to start with and cut the floor and sides out of 3/4 inch finish grade Baltic Birch plywood from Home Depot. At the time it was around $55 a sheet and I ended up using around 5 sheets total. I am not sure the price of the material now, but I found that it was great quality and Home Depot had far better quality birch than Lowes did.

    The floor of the camper is 46.5 inches wide by around 67 inches long if I remember correctly. I am only 5'6" tall so I am able to lay inside of it snugly without laying diagonal or bending my legs.

    I cut out the first side and laid it on top of a full sheet to trace cut the second side so they would be identical.

    The sides are shaped in a fashion that is tapered towards the front and rear of the camper creating an overall length of the body around 84 inches from the peak of each end. Since the sides are both 3/4 inch thick, when they are attached to the outside of the floor platform the overall width of the camper is 48 inches. I planned it this way so that the top pieces could be made from standard width plywood that would rest on top of the side walls so that I could avoid any leaks at the seams. The height of the sides is around 39 inches, just enough for me to sit up inside.

    After the floor and sides were together, I built the bulkhead between the rear cargo area and the sleeping cabin.
    Attached Files

    Comment


    • #3
      Day 2 of the Build:

      After a good 1st day of building I went and picked up my trailer from my friend so that I could sit the body on top and make sure the wheel placement was correct and would not interfere with the door or other components.

      I gathered the components and took measurements, and took more measurements, and more just to make sure I wouldn't cut something wrong or waste any materials. Here is a link to my parts list: https://www.rubbertramprenegade.com/camper-parts-list

      I went with a single 26x32 door from vintage technologies on the passenger side of the camper and a 24x20 window on the drivers side. I used a cargo hatch 24x36 cargo hatch for the rear of the camper to access my storage area.

      For the roof I wanted a skylight for stargazing and found a plexiglass bubble type skylight on amazon that has held up pretty well so far. I also decided on a 14 inch roof fan for ventilation.

      The fenders are diamond plate steel that I later painted black to match the frame and other components. The fenders were a little small so I had to cut slits in the corners and bend them outward so that they would have more clearance on my tires. I had my buddy weld up the gaps for me.
      Attached Files

      Comment


      • #4
        Skinning/Waterproofing:

        After having the body assembled the way I wanted it, I removed the door, window, and other components and proceeded to the waterproofing. There are many ways to skin or waterproof a tiny camper, but I decided on a process called Poor Man's Fiberglass or PMF. PMF is a process similar to fiberglass resin, but used Titebond II wood glue and drop cloths instead of the typical resin and fiberglass cloth. Bed sheets or other fabrics can also be used.

        I have a video on my youtube channel that can be found here:


        I chose this process due to the materials being readily available and easy to work with. I have gotten a lot of feedback on my youtube channel in regards to the cost. I didn't really save much money as compared to regular resin fiberglass, but the odor was a lot more tolerable and the glue allowed for more working time than fiberglass resin that hardens quickly.

        I started with the bottom of the camper body then the sides, then the top making sure to overlap all my seems so that water would run off the body in a way not to penetrate any seams that didn't seal perfectly.

        I placed the cloth on each panel and trimmed it up some before starting, then trimmed it more tightly as I glued it. I found a good pair of scissors helps because the cloth frays less. Spending around $10 for a good pair of scissors is well worth the money. I got mine at harbor freight and were surprisingly better quality than I expected to find there considering they have cheap items in general.

        I also found that taking the body off the frame and rolling it around on furniture dollies made this entire process easier.

        Painting:

        After allowing the PMF to dry for a couple days I moved on to paint. I decided on a rustoleum oil base enamel that was the same color as my Tacoma. The standard rustoleum color "smoke gray" matches toyotas "cement gray" rather well.

        The paint dried with a nice gloss finish to it and the texture of the canvas created a rugged look similar to a bedliner coating. Being that my camper build was more of an off road build than the typical tear drop I think it works.
        Attached Files

        Comment


        • #5
          Electrical:

          There's really nothing complicated with my electrical system. I basically just wired my fan and interior lights to a fuse panel then wired a 12 volt extension cord to the fuse panel that could be plugged into a portable battery such as a Jackery or Goal Zero. After wiring it up I tested the system with a drill battery.
          Attached Files

          Comment


          • #6
            Putting it all together:

            After waiting for the paint to dry, I reassembled everything. I bolted the body to the frame through the sides of the camper body. My floor is raised 2 inches up from the bottom of the sides so that the body can not only sit on top of the frame, but sit snugly around it.

            I stained the interior a white was type stain and made a shelf that I stained black. I wanted it all to match the grey and black theme of my truck.

            I am quite happy with how it turned out and hope you can learn from my build. I am not an expert builder by any means, but enjoyed the process. Here are some photos of it put back together and a link to a tour video on Youtube:

            Attached Files

            Comment


            • #7
              Looks good. Is the birch plywood veneer on both sides?

              Comment


              • #8
                Originally posted by Dennis L View Post
                Looks good. Is the birch plywood veneer on both sides?
                The entire body is made from 3/4 inch Birch plywood with no insulation. I just countersunk and screwed it all together with a bead of wood glue at each joint. It has held up great so far. I keep it parked inside the garage when I am not out camping so I think that has helped maintain it also. Here is a link to what I used:

                Comment


                • #9
                  Very cool build! Thanks for sharing! I always liked the 'squaredrop' style, having built one myself. The shape makes it feel so much larger than the traditional teardrop. Love that skylight too!

                  Comment

                  Working...
                  X